
Transformers documentation
零样本图像分类
零样本图像分类
零样本图像分类是一项任务,它要求使用未在包含这些特定类别的标注示例数据上显式训练过的模型,将图像分类到不同的类别中。
传统上,图像分类需要在特定的带标签图像集合上训练模型,该模型学习将某些图像特征“映射”到标签。当需要使用此类模型执行引入新标签集合的分类任务时,需要进行微调以“重新校准”模型。
相比之下,零样本或开放词汇图像分类模型通常是多模态模型,它们在包含大量图像及其相关描述的数据集上进行训练。这些模型学习对齐的视觉-语言表示,可用于许多下游任务,包括零样本图像分类。
这是一种更灵活的图像分类方法,它允许模型泛化到新的、未见过的类别,而无需额外的训练数据,并支持用户使用自由形式的文本描述来查询目标对象。
在本指南中,您将学习如何:
- 创建一个零样本图像分类流水线
- 手动运行零样本图像分类推理
在开始之前,请确保已安装所有必要的库:
pip install -q "transformers[torch]" pillow零样本图像分类流水线
尝试使用支持零样本图像分类的模型进行推理的最简单方法是使用对应的 pipeline()。 从 Hugging Face Hub 上的检查点 实例化一个 pipeline:
>>> from transformers import pipeline

>>> checkpoint = "openai/clip-vit-large-patch14"
>>> detector = pipeline(model=checkpoint, task="zero-shot-image-classification")
接下来,选择一张您想要分类的图像。
>>> from PIL import Image
>>> import requests

>>> url = "https://unsplash.com/photos/g8oS8-82DxI/download?ixid=MnwxMjA3fDB8MXx0b3BpY3x8SnBnNktpZGwtSGt8fHx8fDJ8fDE2NzgxMDYwODc&force=true&w=640"
>>> image = Image.open(requests.get(url, stream=True).raw)

>>> image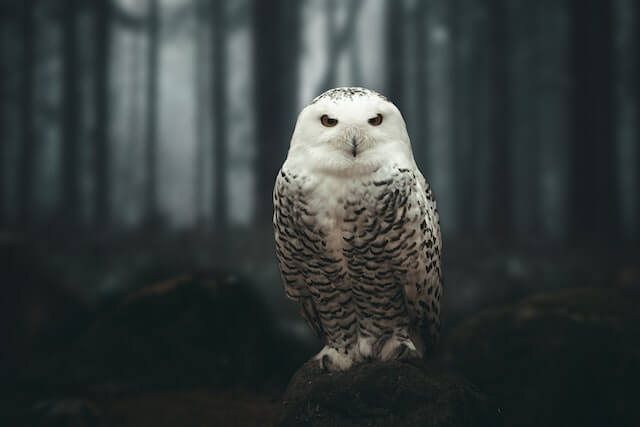
将图像和候选对象标签传入 pipeline。这里我们直接传入图像;其他合适的选项包括图像的本地路径或图像 URL。 候选标签可以是本例中的简单单词,也可以是更具描述性的内容。
>>> predictions = detector(image, candidate_labels=["fox", "bear", "seagull", "owl"])
>>> predictions
[{'score': 0.9996670484542847, 'label': 'owl'},
 {'score': 0.000199399160919711, 'label': 'seagull'},
 {'score': 7.392891711788252e-05, 'label': 'fox'},
 {'score': 5.96074532950297e-05, 'label': 'bear'}]
手动实现零样本图像分类
现在你已经了解了如何使用零样本图像分类流水线,让我们来看看如何手动运行零样本图像分类。
首先,从Hugging Face Hub 上的检查点加载模型及其关联的处理器。 这里我们将使用与之前相同的检查点:
>>> from transformers import AutoProcessor, AutoModelForZeroShotImageClassification

>>> model = AutoModelForZeroShotImageClassification.from_pretrained(checkpoint)
>>> processor = AutoProcessor.from_pretrained(checkpoint)
让我们换一张不同的图片来变换一下花样。
>>> from PIL import Image
>>> import requests

>>> url = "https://unsplash.com/photos/xBRQfR2bqNI/download?ixid=MnwxMjA3fDB8MXxhbGx8fHx8fHx8fHwxNjc4Mzg4ODEx&force=true&w=640"
>>> image = Image.open(requests.get(url, stream=True).raw)

>>> image
使用处理器为模型准备输入。该处理器结合了图像处理器和分词器:图像处理器通过调整大小和归一化来为模型准备图像,而分词器则负责处理文本输入。
>>> candidate_labels = ["tree", "car", "bike", "cat"]
# follows the pipeline prompt template to get same results
>>> candidate_labels = [f'This is a photo of {label}.' for label in candidate_labels]
>>> inputs = processor(images=image, text=candidate_labels, return_tensors="pt", padding=True)
将输入通过模型,并对结果进行后处理:
>>> import torch

>>> with torch.no_grad():
...     outputs = model(**inputs)

>>> logits = outputs.logits_per_image[0]
>>> probs = logits.softmax(dim=-1).numpy()
>>> scores = probs.tolist()

>>> result = [
...     {"score": score, "label": candidate_label}
...     for score, candidate_label in sorted(zip(probs, candidate_labels), key=lambda x: -x[0])
... ]

>>> result
[{'score': 0.998572, 'label': 'car'},
 {'score': 0.0010570387, 'label': 'bike'},
 {'score': 0.0003393686, 'label': 'tree'},
 {'score': 3.1572064e-05, 'label': 'cat'}]