
Datasets documentation
语义分割
You are viewing main version, which requires installation from source. If you'd like
regular pip install, checkout the latest stable version (v4.8.4).
语义分割
语义分割数据集用于训练模型对图像中的每个像素进行分类。这些数据集支持广泛的应用,例如从图像中移除背景、为图像添加风格化效果,或用于自动驾驶的场景理解。本指南将展示如何对图像分割数据集应用变换。
在开始之前,请确保已安装最新版本的 albumentations 和 cv2:
pip install -U albumentations opencv-python
Albumentations 是一个用于计算机视觉数据增强的 Python 库。它支持多种计算机视觉任务,例如图像分类、目标检测、分割和关键点估计。
本指南使用 Scene Parsing 数据集,将图像分割并解析为与语义类别(如天空、道路、人物和床)相关联的不同图像区域。
加载数据集的 train 分割,并查看一个示例:
>>> from datasets import load_dataset

>>> dataset = load_dataset("scene_parse_150", split="train")
>>> index = 10
>>> dataset[index]
{'image': <PIL.JpegImagePlugin.JpegImageFile image mode=RGB size=683x512 at 0x7FB37B0EC810>,
 'annotation': <PIL.PngImagePlugin.PngImageFile image mode=L size=683x512 at 0x7FB37B0EC9D0>,
 'scene_category': 927}
数据集包含三个字段:
image:一个 PIL 图像对象。annotation:图像的分割掩码。scene_category:图像的标签或场景类别(例如“厨房”或“办公室”)。
接下来,使用以下命令查看图像:
>>> dataset[index]["image"]
类似地,您可以查看相应的分割掩码:
>>> dataset[index]["annotation"]
我们还可以在分割掩码上添加调色板,并将其叠加到原始图像上,以可视化数据集:
在定义好调色板之后,您应该已经准备好可视化一些叠加层了。
>>> import matplotlib.pyplot as plt

>>> def visualize_seg_mask(image: np.ndarray, mask: np.ndarray):
...    color_seg = np.zeros((mask.shape[0], mask.shape[1], 3), dtype=np.uint8)
...    palette = np.array(create_ade20k_label_colormap())
...    for label, color in enumerate(palette):
...        color_seg[mask == label, :] = color
...    color_seg = color_seg[..., ::-1]  # convert to BGR

...    img = np.array(image) * 0.5 + color_seg * 0.5  # plot the image with the segmentation map
...    img = img.astype(np.uint8)

...    plt.figure(figsize=(15, 10))
...    plt.imshow(img)
...    plt.axis("off")
...    plt.show()


>>> visualize_seg_mask(
...     np.array(dataset[index]["image"]),
...     np.array(dataset[index]["annotation"])
... )
现在使用 albumentations 应用一些数据增强。首先,调整图像大小并调节其亮度。
>>> import albumentations

>>> transform = albumentations.Compose(
...     [
...         albumentations.Resize(256, 256),
...         albumentations.RandomBrightnessContrast(brightness_limit=0.3, contrast_limit=0.3, p=0.5),
...     ]
... )
创建一个函数,将转换应用于图像:
>>> def transforms(examples):
...     transformed_images, transformed_masks = [], []
...
...     for image, seg_mask in zip(examples["image"], examples["annotation"]):
...         image, seg_mask = np.array(image), np.array(seg_mask)
...         transformed = transform(image=image, mask=seg_mask)
...         transformed_images.append(transformed["image"])
...         transformed_masks.append(transformed["mask"])
...
...     examples["pixel_values"] = transformed_images
...     examples["label"] = transformed_masks
...     return examples
使用 set_transform() 函数对数据集的批次进行即时转换,以减少磁盘空间占用:
>>> dataset.set_transform(transforms)您可以通过对示例的 pixel_values 和 label 进行索引来验证转换是否成功:
>>> image = np.array(dataset[index]["pixel_values"])
>>> mask = np.array(dataset[index]["label"])

>>> visualize_seg_mask(image, mask)
在本指南中,您使用 albumentations 对数据集进行了增强。您也可以使用 torchvision 来应用一些类似的变换。
>>> from torchvision.transforms import Resize, ColorJitter, Compose

>>> transformation_chain = Compose([
...     Resize((256, 256)),
...     ColorJitter(brightness=0.25, contrast=0.25, saturation=0.25, hue=0.1)
... ])
>>> resize = Resize((256, 256))

>>> def train_transforms(example_batch):
...     example_batch["pixel_values"] = [transformation_chain(x) for x in example_batch["image"]]
...     example_batch["label"] = [resize(x) for x in example_batch["annotation"]]
...     return example_batch

>>> dataset.set_transform(train_transforms)

>>> image = np.array(dataset[index]["pixel_values"])
>>> mask = np.array(dataset[index]["label"])

>>> visualize_seg_mask(image, mask)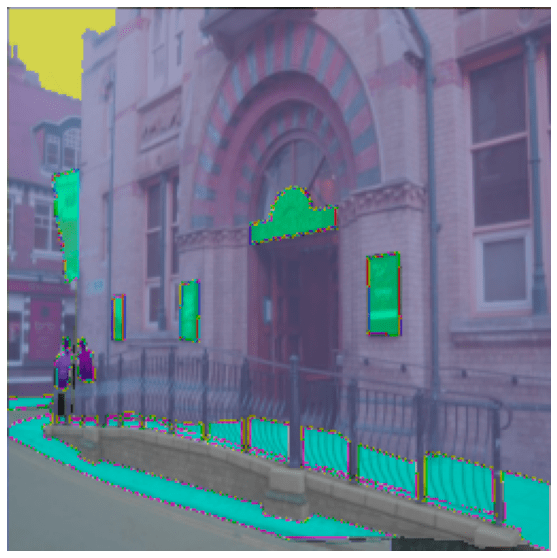
Update on GitHub现在您已经了解了如何处理用于语义分割的数据集,接下来学习如何训练语义分割模型并使用它进行推理。