
Datasets documentation
セマンティックセグメンテーション
セマンティックセグメンテーション
セマンティックセグメンテーションデータセットは、画像内のすべてのピクセルを分類するモデルの学習に使用されます。これらのデータセットにより、画像からの背景除去、画像のスタイル化、自動運転のためのシーン理解など、幅広いアプリケーションが実現できます。このガイドでは、画像セグメンテーションデータセットにトランスフォーメーションを適用する方法を示します。
開始する前に、albumentationsとcv2の最新バージョンがインストールされていることを確認してください。
pip install -U albumentations opencv-python
Albumentationsは、コンピュータビジョンのためのデータ拡張を実行するためのPythonライブラリです。画像分類、物体検出、セグメンテーション、キーポイント推定など、さまざまなコンピュータビジョンタスクに対応しています。
このガイドでは、Scene Parsingデータセットを使用して、空、道路、人物、ベッドなどの意味的カテゴリに関連付けられた異なる画像領域に分割・解析します。
train スプリットのデータセットを読み込み、例を確認します:
>>> from datasets import load_dataset

>>> dataset = load_dataset("scene_parse_150", split="train")
>>> index = 10
>>> dataset[index]
{'image': <PIL.JpegImagePlugin.JpegImageFile image mode=RGB size=683x512 at 0x7FB37B0EC810>,
 'annotation': <PIL.PngImagePlugin.PngImageFile image mode=L size=683x512 at 0x7FB37B0EC9D0>,
 'scene_category': 927}
データセットには3つのフィールドがあります:
image: PIL画像オブジェクト。annotation: 画像のセグメンテーションマスク。scene_category: 画像のラベルまたはシーンカテゴリ(「kitchen」や「office」など)。
次に、次のコマンドで画像を確認します:
>>> dataset[index]["image"]
同様に、対応するセグメンテーションマスクを確認できます:
>>> dataset[index]["annotation"]
セグメンテーションマスクにカラーパレットを追加し、元の画像に重ねて表示することで、データセットを視覚化することもできます:
カラーパレットを定義した後、オーバーレイの可視化の準備が整うはずです。
>>> import matplotlib.pyplot as plt

>>> def visualize_seg_mask(image: np.ndarray, mask: np.ndarray):
...    color_seg = np.zeros((mask.shape[0], mask.shape[1], 3), dtype=np.uint8)
...    palette = np.array(create_ade20k_label_colormap())
...    for label, color in enumerate(palette):
...        color_seg[mask == label, :] = color
...    color_seg = color_seg[..., ::-1]  # convert to BGR

...    img = np.array(image) * 0.5 + color_seg * 0.5  # plot the image with the segmentation map
...    img = img.astype(np.uint8)

...    plt.figure(figsize=(15, 10))
...    plt.imshow(img)
...    plt.axis("off")
...    plt.show()


>>> visualize_seg_mask(
...     np.array(dataset[index]["image"]),
...     np.array(dataset[index]["annotation"])
... )
次に、albumentationsでいくつかの拡張を適用します。まず、画像をリサイズし、明るさを調整します。
>>> import albumentations

>>> transform = albumentations.Compose(
...     [
...         albumentations.Resize(256, 256),
...         albumentations.RandomBrightnessContrast(brightness_limit=0.3, contrast_limit=0.3, p=0.5),
...     ]
... )
画像にトランスフォーメーションを適用する関数を作成します:
>>> def transforms(examples):
...     transformed_images, transformed_masks = [], []
...
...     for image, seg_mask in zip(examples["image"], examples["annotation"]):
...         image, seg_mask = np.array(image), np.array(seg_mask)
...         transformed = transform(image=image, mask=seg_mask)
...         transformed_images.append(transformed["image"])
...         transformed_masks.append(transformed["mask"])
...
...     examples["pixel_values"] = transformed_images
...     examples["label"] = transformed_masks
...     return examples
set_transform() 関数を使用して、データセットのバッチにトランスフォーメーションをオンザフライで適用し、ディスク容量の消費を削減できます:
>>> dataset.set_transform(transforms)pixel_valuesとlabelにインデックスを指定して、変換が正常に実行されたことを確認できます。
>>> image = np.array(dataset[index]["pixel_values"])
>>> mask = np.array(dataset[index]["label"])

>>> visualize_seg_mask(image, mask)
このガイドでは、albumentationsを使用してデータセットの拡張を行いました。torchvisionを使用して、同様の変換を適用することも可能です。
>>> from torchvision.transforms import Resize, ColorJitter, Compose

>>> transformation_chain = Compose([
...     Resize((256, 256)),
...     ColorJitter(brightness=0.25, contrast=0.25, saturation=0.25, hue=0.1)
... ])
>>> resize = Resize((256, 256))

>>> def train_transforms(example_batch):
...     example_batch["pixel_values"] = [transformation_chain(x) for x in example_batch["image"]]
...     example_batch["label"] = [resize(x) for x in example_batch["annotation"]]
...     return example_batch

>>> dataset.set_transform(train_transforms)

>>> image = np.array(dataset[index]["pixel_values"])
>>> mask = np.array(dataset[index]["label"])

>>> visualize_seg_mask(image, mask)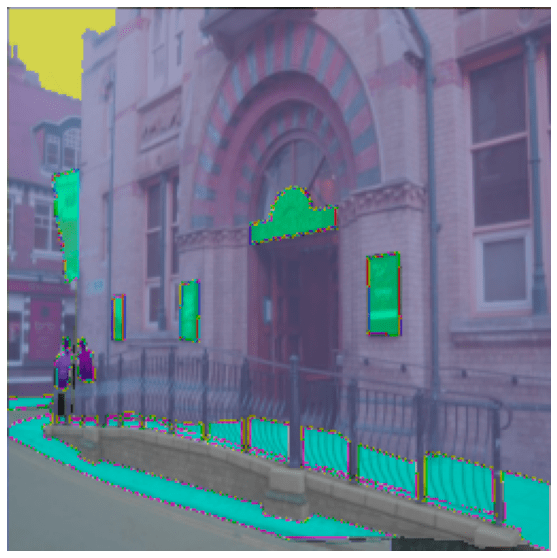
Update on GitHubセマンティックセグメンテーション用のデータセットの処理方法が分かったところで、セマンティックセグメンテーションモデルの学習方法と、推論での使用方法を学びましょう。